Lothmoor Abbey - Tour Worthy!
Feb 20, 2022 15:18:09 GMT -5
greenlightning, meyo, and 7 more like this
Post by sroel908 on Feb 20, 2022 15:18:09 GMT -5
Welcome to Lothmoor Abbey, my newest design in PGA Tour 2K21!

Set on the rolling, hilly grounds of an old monastery, Lothmoor Abbey will offer an accessible round of golf for all levels of play. Open fairways give players confidence and options off the tee, while the undulating greens and elevation changes provide challenge and interest throughout the round.
There are three tees to play from, and the back tees extend to just under 7,000 yards. The course is a Par-72 layout, with five par-3s, eight par-4s, and five par-5s.
Hole-by-Hole Course Tour
Hole 1 - Par 4 - Green: 359, White: 445, Blue: 452
This uphill opener is a great way to be welcomed to the Abbey. The generous landing area is defended by a bunker, and the green is also protected by sand on either side. The green might look fairly benign, but it has some subtle slopes that will make putting tricky.

Hole 2 - Par 3 - Green: 104, White: 140, Blue: 145
After trekking uphill on Hole 1, the second sends you back down the other side of the hill. The large bunker on the right of the green is the major hazard to avoid, and hitting the right spot on the green is essential if you want a look at birdie.
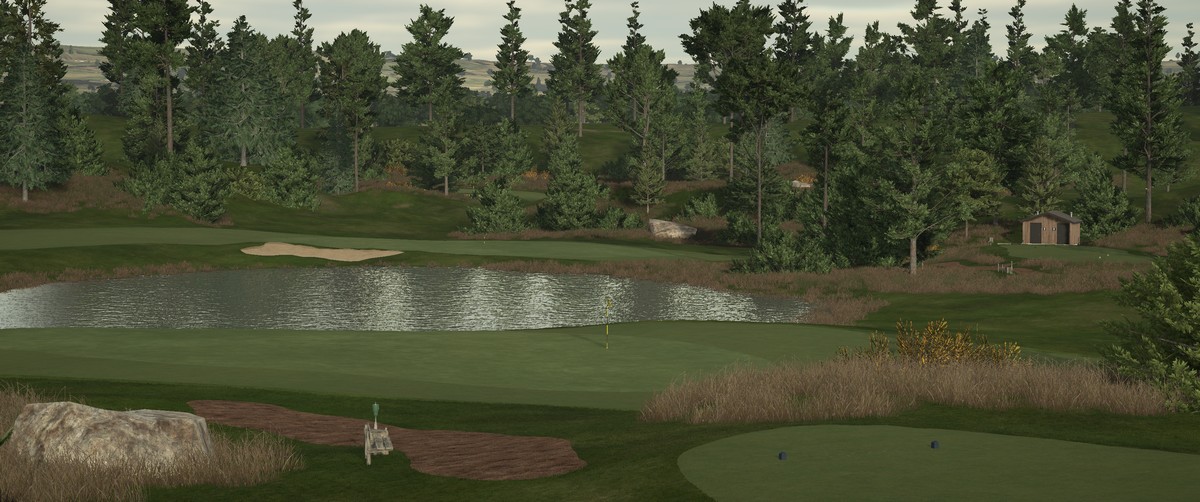
Hole 3 - Par 5 - Green: 524, White: 550, Blue: 564
Three sand traps surround the landing area on the Abbey's first par-5. The fairway slopes from left to right all the way to the green, so take that into consideration when trying for the green in two. A distinct slope cuts through the green's back third, making putts to that section of the green difficult from the other areas of the surface.
Hole 4 - Par 4 - Green: 350, White: 367, Blue: 376
This short par-4 sees a centerline hazard set 290 yards from the back tee. Accuracy is required on your tee shot. A drive to the left of the centerline hazard gives you a shorter approach, but forces you to hit over a deep greenside bunker. A drive to the right of it is longer, but takes that greenside hazard out of the picture. The green is slick, and the right side slopes dramatically to a runoff area.
Hole 5 - Par 4 - Green: 397, White: 429, Blue: 450
This dogleg-right hole gives you a couple options off the tee: take the easy path straight ahead with less than driver, or try to avoid the trees near the tee box and cut the corner as much as possible. The green funnels approach shots to the center, and there are no greenside bunkers to worry about here.
Hole 6 - Par 3 - Green: 158, White: 184, Blue: 197
This challenging par-3 has a green protected by two bunkers, and the green also has a prominent slope in the center of it that runs shots hit into it down to the far right side of the putting surface. If you miss to that right side, and the pin is on the left, you're looking at a very long birdie try.

Hole 7 - Par 5 - Green: 497, White: 548, Blue: 559
This par-5 requires a blind uphill tee shot, but don't fret. The fairway is vast, and the aiming cross straight ahead of you gives you the ideal spot to aim to hit the center of the landing zone. The second shot is impacted by a bunker on the right that looks closer to the green than it is; it's 60 yards short of the putting surface. This green has lots of slopes and undulations, so walking away with birdie is not a forgone conclusion!
Hole 8 - Par 4 - Green: 392, White: 434, Blue: 446
Back downhill we go here, with this snaking par-4 that plays shorter than the yardage. Aim over the bunker closest to you for the ideal angle. Beware the two other bunkers farther down the fairway, though, as they can come into play off the tee depending on wind. The green is dramatic and slopes front to back, thanks to the continued downhill nature of this part of the property.
Hole 9 - Par 5 - Green: 502, White: 560, Blue: 572
Finish off the front nine with another downhill hole that leads back to the Abbey clubhouse. The landing area will help push your tee shot closer to the hole, so reaching in two here is a very distinct possibility. The green slopes right to left, and is protected by three bunkers, two on the right and one on the left.
Hole 10 - Par 3 - Green: 135, White: 144, Blue: 149
This cozy short hole is set in a valley between several prominent hills. The green is perched up a bit, and slopes heavily from back to front. A solitary bunker defends against errant shots.

Hole 11 - Par 4 - Green: 332, White: 335, Blue: 355
Another short par-4 is on deck here, but don't get lulled into thinking this one's a cakewalk! The landing zone is narrow, it slopes left to right, and has two large, nasty bunkers off the the right of it that are to be avoided at all costs. A third bunker pinches the neck of the fairway as it gets closer to the green. The green slopes hard to the right, and any shot to the right third of it will find itself off the green and well below the putting surface. This is a reachable par-4 in certain conditions.
Hole 12 - Par 4 - Green: 419, White: 432, Blue: 442
The uphill par-4 features a fairway bunker that's not in play for most. A generous landing area gives you a wedge into this undulating green. Don't be long past the green, though, as there's a gnarly waste area beyond the fence that is in play.
Hole 13 - Par 3 - Green: 149, White: 173, Blue: 182
Back up a hill once again on this par-3, which requires you to avoid the front greenside bunker off the tee. Several slopes on the green help usher your ball to various pin positions, so use them to your advantage.
Hole 14 - Par 5 - Green: 517, White: 560, Blue: 589
Time to go back downhill with this demanding, exciting par-5 hole. The dogleg-right fairway cuts in between two bunkers that catch errant tee shots with ease. Your second leaves you with the option to layup to the left section of fairway, or to go straight over the lake and try to reach in two. A bunker is in front of the green to grab anything short and to the left. The wide green features some interesting contours, too.
Hole 15 - Par 4 - Green: 284, White: 313, Blue: 324
This drivable par-4 will test your mettle! The green is about 20 feet uphill from the tee box, and is protected by a deep and intimidating bunker in front. A grassy waste area is also off to the left of the fairway. The green slopes are pronounced, and can help or hurt you, depending on pin placement. Scores here can range from eagle to bogey with just one misplaced shot.
Hole 16 - Green: 411, White: 485, Blue: 509
The long par-4 16th might make you pay if you didn't card a birdie or better on the previous hole, especially if the wind is at your face. Another aiming cross guides you to the proper line to take, and will help you avoid the two fairway bunkers. A long approach shot into a well-guarded, sloped green is difficult. Take par here and run to the next.

Hole 17 - Par 5 - Green: 501, White: 519, Blue: 535
This signature stretch at the Abbey starts here, with a hole affectionately known as the "Hail Mary". While it's a relatively short par-5, it features a centerline bunker that's 325 yards from the back tees, as well as an uphill, blind second shot to the green if you're hoping for eagle. All that will guide you on your second is an aiming cross in the distance, indicating the line to the center of green. The green is separated from the fairway by tall grass and bushes, and the green itself is small and heavily sloped.

Hole 18 - Par 3 - Green: 101, White: 123, Blue: 140
The last hole at the Abbey is a bit unique for a finisher, as it's a 30-foot downhill par-3! The length of the hole requires you to only use a wedge, but the green is protected at front and back by two deep hazards, as well as a pond to the left. The green is also quite large, is heavily undulated, and putts from anywhere and any length are a challenge. With a stunning view of the Abbey and the property, the 18th tee box is a great place to capture one final photo before you end your round.

This uphill opener is a great way to be welcomed to the Abbey. The generous landing area is defended by a bunker, and the green is also protected by sand on either side. The green might look fairly benign, but it has some subtle slopes that will make putting tricky.
Hole 2 - Par 3 - Green: 104, White: 140, Blue: 145
After trekking uphill on Hole 1, the second sends you back down the other side of the hill. The large bunker on the right of the green is the major hazard to avoid, and hitting the right spot on the green is essential if you want a look at birdie.
Hole 3 - Par 5 - Green: 524, White: 550, Blue: 564
Three sand traps surround the landing area on the Abbey's first par-5. The fairway slopes from left to right all the way to the green, so take that into consideration when trying for the green in two. A distinct slope cuts through the green's back third, making putts to that section of the green difficult from the other areas of the surface.
Hole 4 - Par 4 - Green: 350, White: 367, Blue: 376
This short par-4 sees a centerline hazard set 290 yards from the back tee. Accuracy is required on your tee shot. A drive to the left of the centerline hazard gives you a shorter approach, but forces you to hit over a deep greenside bunker. A drive to the right of it is longer, but takes that greenside hazard out of the picture. The green is slick, and the right side slopes dramatically to a runoff area.
Hole 5 - Par 4 - Green: 397, White: 429, Blue: 450
This dogleg-right hole gives you a couple options off the tee: take the easy path straight ahead with less than driver, or try to avoid the trees near the tee box and cut the corner as much as possible. The green funnels approach shots to the center, and there are no greenside bunkers to worry about here.
Hole 6 - Par 3 - Green: 158, White: 184, Blue: 197
This challenging par-3 has a green protected by two bunkers, and the green also has a prominent slope in the center of it that runs shots hit into it down to the far right side of the putting surface. If you miss to that right side, and the pin is on the left, you're looking at a very long birdie try.
Hole 7 - Par 5 - Green: 497, White: 548, Blue: 559
This par-5 requires a blind uphill tee shot, but don't fret. The fairway is vast, and the aiming cross straight ahead of you gives you the ideal spot to aim to hit the center of the landing zone. The second shot is impacted by a bunker on the right that looks closer to the green than it is; it's 60 yards short of the putting surface. This green has lots of slopes and undulations, so walking away with birdie is not a forgone conclusion!
Hole 8 - Par 4 - Green: 392, White: 434, Blue: 446
Back downhill we go here, with this snaking par-4 that plays shorter than the yardage. Aim over the bunker closest to you for the ideal angle. Beware the two other bunkers farther down the fairway, though, as they can come into play off the tee depending on wind. The green is dramatic and slopes front to back, thanks to the continued downhill nature of this part of the property.
Hole 9 - Par 5 - Green: 502, White: 560, Blue: 572
Finish off the front nine with another downhill hole that leads back to the Abbey clubhouse. The landing area will help push your tee shot closer to the hole, so reaching in two here is a very distinct possibility. The green slopes right to left, and is protected by three bunkers, two on the right and one on the left.
Hole 10 - Par 3 - Green: 135, White: 144, Blue: 149
This cozy short hole is set in a valley between several prominent hills. The green is perched up a bit, and slopes heavily from back to front. A solitary bunker defends against errant shots.
Hole 11 - Par 4 - Green: 332, White: 335, Blue: 355
Another short par-4 is on deck here, but don't get lulled into thinking this one's a cakewalk! The landing zone is narrow, it slopes left to right, and has two large, nasty bunkers off the the right of it that are to be avoided at all costs. A third bunker pinches the neck of the fairway as it gets closer to the green. The green slopes hard to the right, and any shot to the right third of it will find itself off the green and well below the putting surface. This is a reachable par-4 in certain conditions.
Hole 12 - Par 4 - Green: 419, White: 432, Blue: 442
The uphill par-4 features a fairway bunker that's not in play for most. A generous landing area gives you a wedge into this undulating green. Don't be long past the green, though, as there's a gnarly waste area beyond the fence that is in play.
Hole 13 - Par 3 - Green: 149, White: 173, Blue: 182
Back up a hill once again on this par-3, which requires you to avoid the front greenside bunker off the tee. Several slopes on the green help usher your ball to various pin positions, so use them to your advantage.
Hole 14 - Par 5 - Green: 517, White: 560, Blue: 589
Time to go back downhill with this demanding, exciting par-5 hole. The dogleg-right fairway cuts in between two bunkers that catch errant tee shots with ease. Your second leaves you with the option to layup to the left section of fairway, or to go straight over the lake and try to reach in two. A bunker is in front of the green to grab anything short and to the left. The wide green features some interesting contours, too.
Hole 15 - Par 4 - Green: 284, White: 313, Blue: 324
This drivable par-4 will test your mettle! The green is about 20 feet uphill from the tee box, and is protected by a deep and intimidating bunker in front. A grassy waste area is also off to the left of the fairway. The green slopes are pronounced, and can help or hurt you, depending on pin placement. Scores here can range from eagle to bogey with just one misplaced shot.
Hole 16 - Green: 411, White: 485, Blue: 509
The long par-4 16th might make you pay if you didn't card a birdie or better on the previous hole, especially if the wind is at your face. Another aiming cross guides you to the proper line to take, and will help you avoid the two fairway bunkers. A long approach shot into a well-guarded, sloped green is difficult. Take par here and run to the next.
Hole 17 - Par 5 - Green: 501, White: 519, Blue: 535
This signature stretch at the Abbey starts here, with a hole affectionately known as the "Hail Mary". While it's a relatively short par-5, it features a centerline bunker that's 325 yards from the back tees, as well as an uphill, blind second shot to the green if you're hoping for eagle. All that will guide you on your second is an aiming cross in the distance, indicating the line to the center of green. The green is separated from the fairway by tall grass and bushes, and the green itself is small and heavily sloped.
Hole 18 - Par 3 - Green: 101, White: 123, Blue: 140
The last hole at the Abbey is a bit unique for a finisher, as it's a 30-foot downhill par-3! The length of the hole requires you to only use a wedge, but the green is protected at front and back by two deep hazards, as well as a pond to the left. The green is also quite large, is heavily undulated, and putts from anywhere and any length are a challenge. With a stunning view of the Abbey and the property, the 18th tee box is a great place to capture one final photo before you end your round.